Saturday, December 30, 2006

Navision SQL - Recovery Model

Navision with SQL Server 2000 - Recovery Model

(You can access to the above setup screen from Menu File --> Database --> Alter)

Navision SQL Option allow 3 types of Recovery Models in the case of database failure. Different models will have different procedures or impacts in our SQL Server database operations. The explanation is below:


The available options are:
  • Bulk-Logged
  • Full
  • Simple

Bulk-Logged

For Bulk-Logged, the transaction log will only contain limited information about certain large-scale or bulk copy operations. The Bulk-Logged recovery model provides protection against media failure combined with the best performance and the minimal use of log space for certain large-scale or bulk copy operations.

The backup strategy for bulk-logged recovery consists of:
  • Database backups.
  • Differential backups (optional).
Full

In Full recovery model, the details of every transaction are stored in the transaction log, and this information can be used when you apply transaction log backups. The Full recovery model uses database backups and transaction log backups to provide complete protection against media failure. If one or more data files are damaged, media recovery can restore all the committed transactions. Incomplete transactions are rolled back.

Full Recovery allows you to recover the database to the point of failure or to a specific point in time. All the operations, including bulk operations such as SELECT INTO, CREATE INDEX and bulk loading data, are fully logged to guarantee that the database is completely recoverable.

The backup strategy for Full recovery consists of:
  • Database backups.
  • Differential backups (optional).
  • Transaction log backups.
The Full and Bulk-Logged recovery models are similar, and many users of the Full Recovery model will use the Bulk-Logged model occasionally.


Simple

And the last model is Simple recovery model, which the database can be recovered to the point at which the last backup was made. But, please take note that you cannot restore the database to the point of failure or to a specific point in time.

Thus, if your company need to do that, please choose either the Full or Bulk-Logged Recovery model.

The backup strategy for simple recovery consists of:
  • Database backups.
  • Differential backups (optional).
Cheers and Happy New Year 2007!!!

Friday, December 29, 2006

Navision - Sales History Feature

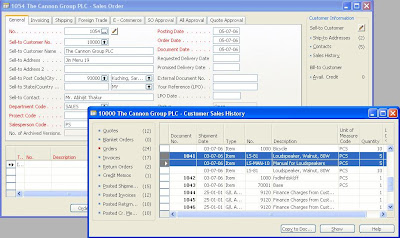
As you know, in Navision 4.0 now, we can actually access to Sales History (on the right side) in Sales Order screen. If you click the Sales History, it will show you all History related to the customer by Document Type (Quotes, Blanket Orders, Orders, Invoices, Return Orders, Credit Memos, Posted Shipments, Posted Invoices, Posted Return Receipts and Posted Cr. Memo) .

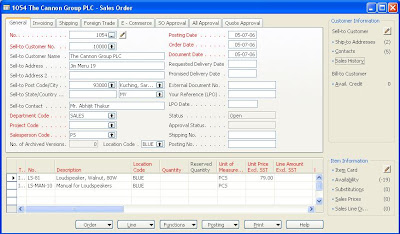
And you can see a button "Copy to Doc...". This function help you to copy the Sales Lines into your current document. Example, I am creating a new Sales Order 1054 for Customer 10000, and I would like to copy back same lines belong to the Sales Order 1041, and I only want the first two sales lines in Order 1041.

Thus, I will just highlight the first two lines under Order 1041 and I click "Copy to Doc..." button. And Navision will copy the two lines into Sales Order 1054 as unillustrated below.


Hope this tips can help......

Tuesday, December 26, 2006

Navision Standard Sales Code

You can use Navision Standard Sales Codes to set up regular sales lines. And Navision allow you to set up any number of standard sales codes, and each of them can consist of any number of standard sales lines. You then specify which standard sales codes to assigned to which customers.

Thus, in a Sales Document (like SaleS Order, Quote, Invoice or Credit Memo), you can call out the Sales Code that belong to the customer and Navision will automatically insert the sales lines into the document.

Let me show you how it works now...


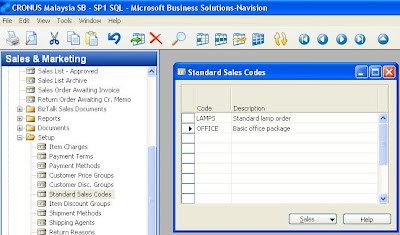
First, we will create a Standard Sales Code called OFFICE (this is a Basic office Package). You can access the setup of Navision Standard Sales Code in Financial Management --> Sales & Marketing --> Order Processing --> Setup --> Standard Sales Code


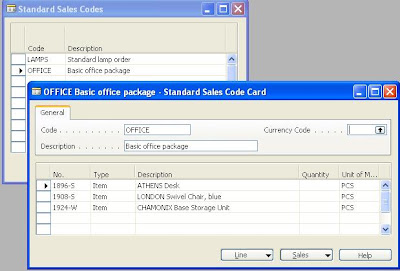
Second, we will create Standard Salies Lines for Office code. For this Basic Office Package, it will contains 3 items. You can access to the Card by pressing Shift+F5.


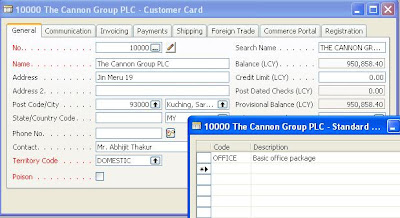
Then, we will assigned Office Standard Sales Code for Customer 10000 The Canon Group in Customer Card. You can actually assigned same Navision Standard Sales Code to multiple customers.

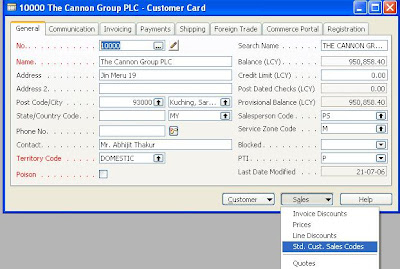
Thus, in Customer Card for Canon Group, click Sales button --> Std. Cust Sales Codes --> F6 (in Code Column) and choose Office Code.


The setup now is completed. And you can start using it in any Sales Document.

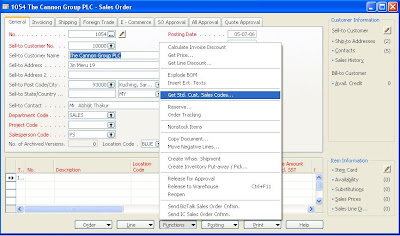
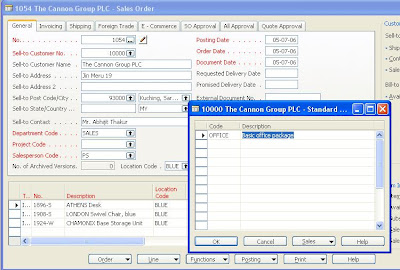
Example, I created a Sales Order for Canon Group. To call out the Office Sales Code, you can click Functions --> Get Std. Sales Code --> Choose Office Code and click OK. After you click OK, Navision will insert all Sales Lines under Office Code.


Cheers!

Friday, December 22, 2006

Post Dated Checks Bug

Last month I have found a small bug in Navision Post Dated Checks function.
My client is using Navision 4.0 SP1 MY version and the problem is actually when user try to cancel PD Checks from Cash Receipt Journal, Navision will always delete first line in journal no matter which line you want to cancel.

I will illustrate it below:

1. User transfer 3Post Dated Check entries in "Post Dated Checks-Sales" to "Cash Journal".


2. I will cancel PD Check 1002 of Customer John Haddock Insurance (line 2 in journal).


3. After I cancel it, you can see Line 1 of Cheque 1001 of Canon Group have been deleted instead of Line 2 PD Check 1002 of Customer John Haddock Insurance.


This minor is due a bug in Codeunit PostDatedCheckMgt --> CancelCheck Function.
The code that give problem is:
The code FIND ('-') , will cause Navision to alway delete the first line. So what we can do here is to change FIND ('-') to FIND ('=').

Cheers!

Friday, December 01, 2006

Navision Shorcut Keys

Navision Shortcut Keys at Glance:

F1 = Help
F2 = Edit
F3 = New Record / Lines
F4 = Delete
F5 = List
F6 = Lookup / Drill down
F7 = Field / Column Filter
F8 = Copy Previous
F9 = Statistics
F11 = Post
F12 = Start / Menu

Ctrl + C = Copy
Ctrl + X = Cut
Ctrl + V = Paste
Ctrl + F = Open Find Box
Ctrl + P = Print
Ctrl + Z = Undo
Ctrl + F2 = Designer
Ctrl + F4 = Close
Ctrl + F5 = Ledger Entries
cTRL + F6 = Next Window
Ctrl + F7 = Table Filter
ctrl + F8 = Zoom
Ctrl + F11 = Release Document

Shift + F5 = Card
Shift + F7 = Flow Filter
Shift + F8 = Sort
Shift + F11 = Post & Print
Shift + F12 = Object Designer

Cheers!